Thursday, April 29, 2021

STAMPIN' UP! BEAUTY OF FRIENDSHIP THINKING OF YOU CARD

 When I was using Shaded Spruce for last night's Colour Creations Showcase, I decided to try it out with a new stamp set, called Beauty of Friendship.  These stamps, along with the co-ordinating Beautiful Trees Dies, are part of the Beauty of Friendship bundle that will be released on 4th May when Stampin' Up!'s new Annual Catalogue goes live.  


I've stamped the tree canopies in Shaded Spruce, and love the variation in shade achieved by stamping each stamp only once.  The sweet little die-cut bird is cut using one of the Beautiful Trees dies; I used Basic White card that has a little texture from being embossed with the new Bark 3D embossing folder (coming on 4th May).  The "sky" paper in the background is from the new Beauty of The Earth Designer Series Paper pack, part of this lovely tree suite.


I created a wall/fence from Crumb Cake card, embossed with the new Bark 3D embossing folder.  Using a sponge dauber, I added Crumb Cake ink to the embossed pattern. I cut two thin strips from the embossed card piece, and layered them to create dimension, giving the impression of a ledge.

The sentiment is from the Beauty of Friendship stamp set.  I stamped it in Shaded Spruce ink, and cut it out with one of the two rectangle dies from Beautiful Trees.  I then matted this piece on a Shaded Spruce Stitched Rectangle die-cut.  A cut-down Square Vellum doily, and some twine coloured with my dark Shaded Spruce Stampin' Blends marker, finish off the card.

A thin strip of Shaded Spruce Designer Series Paper peeks out from behind the trees and the "wall".


It's now less than a week until the beautiful new Annual Catalogue is live - so you don't have to wait much longer to purchase these gorgeous new products, if you're not already a Stampin' Up! demonstrator!


Wednesday, April 28, 2021

AWHT COLOUR CREATIONS SHOWCASE - WEEK 46: SHADED SPRUCE


The colour we're focussing on in this week's Colour Creations Showcase is Shaded Spruce.  Although I love greens, this is one I seldom use, so I enjoyed this challenge.  Cathy Proctor is the co-ordinator of our weekly shares, and she has on her blog a comprehensive list of everyone taking part in the showcase.  You can see Cathy's beautiful Shaded Spruce creation, and links to everyone else's blog posts, on her blog.

I have paired Shaded Spruce with Crumb Cake for my card this week.  Starting off with a Crumb Cake card base, I added a Shaded Spruce layer that has been embossed with the Subtle 3D embossing folder.  I die-cut a number of foliage pieces, from the Forever Fern bundle, using Shaded Spruce card backed with Adhesive Sheets.  This means there's no glue mess when sticking down the die-cuts - just peel off the backing paper, and adhere.  Love it (I just need to remember to use them more often!).


Here's a closer look at the background.  I added some rhinestones coloured with the Dark Shaded Spruce Stampin' Blends marker.


To create the sentiment panel, I first stamped, in Shaded Spruce ink, some leaves and splatters from Forever Fern on Crumb Cake card.  I sponged the edges with Crumb Cake ink, then adhered this piece to a slightly larger Crumb Cake panel embossed with the Tasteful Textile 3D embossing folder.  I stamped "hello" in Shaded Spruce ink on a scrap of Crumb Cake card, and cut it out using a tiny tag die from Ornate Frames.  (The hole of the tag is covered up with a Linen Thread bow.)  As you can see, I sponged around the edges of the sentiment tag with Crumb Cake ink, too.


Listed below are all the products I used to make this card.  If you live in Australia, and would like to shop with me for your Stampin' Up! supplies, you can get to my online store by clicking on any of the thumbnail images below.

Make sure you go over to Cathy's blog, to see her and everyone else's Shaded Spruce creations.


Product List

Thursday, April 22, 2021

STAMPIN' UP! DANDY LASER CUT DRAGONFLY CARD IN BLUES

When I was creating yesterday's card, I placed a piece of Basic White card underneath the laser cut panel whilst colouring it with Blending Brushes.  This created a stencilled piece that I was able to use as the main panel on today's card.  So, the inky background is Seaside Spray and Misty Moonlight. 

The card base is Basic White Thick cardstock.  To this I adhered some Seaside Spray Designer Series Paper - it's a little hard to tell, but there are two different patterns.  The piece closest to the top of the card has a woodgrain pattern, and the bottom piece is speckled.

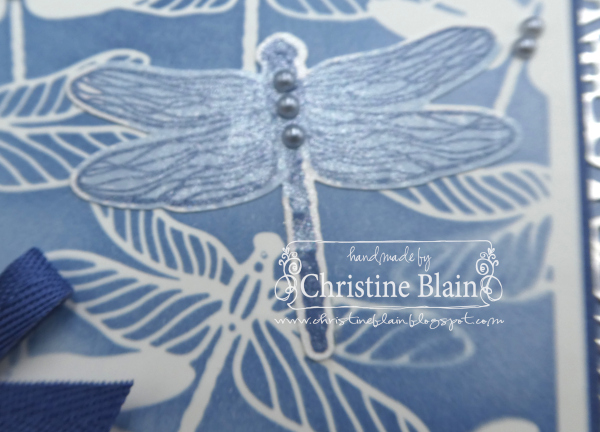
I stamped a single dragonfly on a scrap of Basic White card, using Misty Moonlight ink, and filling in the wings with Seaside Spray ink and the single wing stamp.  After inking the dragonfly, I spritzed it with a solution of Frost White Shimmer Paint and isopropyl alcohol.


The silver foil detail in the background was created with one of the rectangular Ornate Layers Dies.  I cut it in half vertically, and tucked a piece either side of my main panel.  Sticking some Adhesive Sheet to the back of the Silver Foil before die-cutting made it really easy to cleanly adhere the pieces.


In this photo, you can see a little better the shimmer on the stamped and punched-out dragonfly.


The sentiment was created with Misty Moonlight ink, and the Art Gallery bundle.  I added a bow made from Misty Moonlight ribbon.  I love how well Seaside Spray and Misty Moonlight go together, so will really miss Seaside Spray when it retires in a few weeks.


I've listed below all the products used to make this card.  If you live in Australia, and would like to shop with me for your Stampin' Up! supplies, you can get to my online store by clicking on any of the thumbnail images below.


Product List