Showing posts with label Thoughtful Expressions. Show all posts

Wednesday, July 3, 2024

STAMPIN' UP! THOUGHTFUL EXPRESSIONS THANK YOU CARD IN BERRY BURST


This week's Colour Creations blog hop is all about Berry Burst, a beautiful vibrant reddish/purplish pink (how's that for a description? LOL) in Stampin' Up!'s range.

 Basic White die-cuts created with the Perennial Postage Dies created some canvasses for my stamped images, using floral stamps from the Thoughtful Expressions stamp set.


Each piece was stamped in Memento Tuxedo Black ink, then coloured using Stampin' Blends markers.  The leaves were coloured with Lemon Lime Twist and Pretty Peacock, and the flowers with Berry Burst and Bubble Bath.

The splatters in the background were created by flicking the brush tips of my Stampin' Blends markers against the inside of the open lid.  I used Bubble Bath, Berry Burst and Basic Black markers for this.

Brushed Brass Butterflies adorn a couple of the panels.  Each Perennial Postage die-cut is mounted on a layer of Basic Black card.

I used the Light Berry Burst Stampin' Blends marker to colour some Basic Black & Very Vanilla Large Check Ribbon, before making a bow.  Mini Glue Dots work well to secure bows to a card.

The sentiment on my card is from the Best Family Ever stamp set, and it's stamped in Berry Burst ink.


Here's a closer look at the background stamping.  The Berry Burst panel is Delightful Floral Designer Series Paper (an Online Exclusive product).  In Berry Burst ink, I repeatedly stamped a flower outline all over the DSP.  After sponging the edges with Berry Burst ink, I mounted it on a slightly larger piece of Basic Black card, then a Thick Basic White card base.


Next up on tonight's blog hop is Kathryn Ruddick:


If you come across any broken links, or would like to see a comprehensive list of participants in this week's blog hop, head over to Catherine Proctor's blog.  Cathy does a fantastic job of co-ordinating our Colour Creations shares every week.

Listed below are all the products I used to make my card.  If you live in Australia, and would like to shop with me for your Stampin' Up! supplies, you can get to my online store by clicking on any of the thumbnail images below.


Product List

Wednesday, March 6, 2024

STAMPIN' UP! THOUGHTFUL EXPRESSIONS IN PUMPKIN PIE


It's Wednesday night, which means a group of us (all Stampin' Up! demonstrators in Australia) share our creations using Stampin' Up! products all focussing on the same colour.  This week we are showing off Pumpkin Pie, the "OG" orange in Stampin' Up!'s range.

I have two cards to share with you, after having a play with the Thoughtful Expressions bundle and Lifetime of Love Dies.  I have used Pumpkin Pie, Basic White, and Distressed Gold Specialty DSP on both cards.

The way I've coloured my hummingbirds was inspired by this male Rufous Hummingbird:


CARD 1:

For my first card, I used a Crumb Cake card base, and die-cut the larger floral frame from Distressed Gold Specialty DSP.  I cut another piece from Basic White card, and used only the oval/oblong insert.   I stamped the sentiment (from the Hope You Know stamp set) in Memento Tuxedo Black ink, and used a Blending Brush to softly add Pumpkin Pie ink to the whole piece, making it a little darker around the edges.


After cutting a strip of Pumpkin Pie paper from the Stargazing Designer Series Paper pack, I stamped on it using Pumpkin Pie ink, and a floral stamp from Thoughtful Expressions.  I sponged the edges of this piece with Pumpkin Pie ink, too.

The bow was made with Gold Satin-Edged Ribbon, coloured with the Dark Pumpkin Pie Stampin' Blends marker.

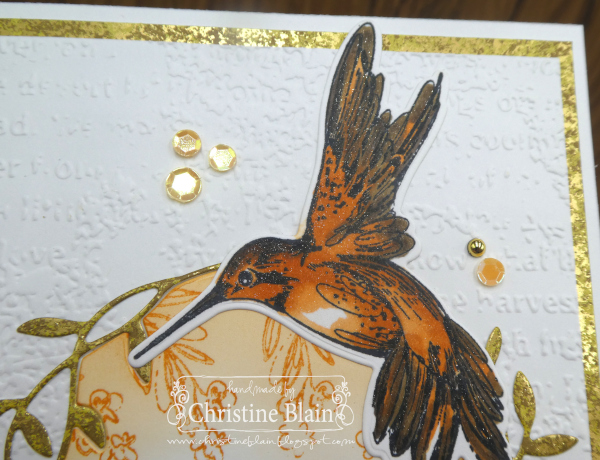
I stamped the hummingbird in Memento Tuxedo Black ink, on Basic White card.  To colour the bird, I used Stampin' Blends markers - Pumpkin Pie Light and Dark, Natural Tones Medium Deep 300, Natural Tones Deep 100, and the Color Lifter.  The hummingbird was cut out with a co-ordinating die.


The Basic White panel in the background was embossed with the Distressed Tile 3D embossing folder, and matted on a Pumpkin Pie card layer.  Here's a closer look at the beautiful fine detail of the Distressed Gold die-cut frame, and the sentiment insert.  I added a few Adhesive-Backed Shiny Sequins (a new Online Exclusive product).


Inside the card, I added a Basic White card insert, decorated with a strip of the same paper as on the front of the card.  I also stamped this piece with flowers, and sponged the edges with Pumpkin Pie ink:


CARD 2:

I hope you're still hanging in there, with this photo-heavy post!  Here is what I made with a second coloured hummingbird, and the other frame from the Lifetime of Love Dies set.  Again I used Gold Satin-Edged Ribbon (that started off Very Vanilla), coloured with my Dark Pumpkin Pie Stampin' Blends marker:


For this card, I used a Thick Basic White card base, and matted the main Basic White panel on Distressed Gold Specialty DSP.  This close-up shows some of the shine and sparkle on my card.  There is Wink of Stella all over the hummingbird, and the embellishments I used are Blooming Pearls and the new Adhesive-Backed Shiny Sequins (an Online Exclusive product).

The Basic White panel was embossed with the Timeworn Type 3D embossing folder.


Similarly to my first card, I die-cut a second frame from Basic White card, but used only the inner part to inlay in the Distressed Gold frame.  I stamped the sentiment in Memento Tuxedo Black ink, and the flowers in Pumpkin Pie ink.  I then used what was left on my Blending Brush (after inking it for my first card) to add Pumpkin Pie ink to this piece.

I found with this frame that it stretched a little (user error, I'm sure!) when I removed the Adhesive Sheet from the back in order to stick it down on my card.  I didn't fit it snugly around the sentiment piece, but hey, it's a handmade card!


Next up on tonight's blog hop is Rosa Leyden:


If you come across any broken links, or would like to see a full list of participants in this week's blog hop, head over to Catherine Proctor's blog.  Cathy does a fantastic job every week, of co-ordinating our Colour Creations shares.

Listed below are all the products I used to make these cards.  If you live in Australia, and would like to shop with me for your Stampin' Up! supplies, you can get to my online store by clicking on any of the thumbnail images below.


Product List