Showing posts with label Contempo Christmas. Show all posts

Saturday, May 19, 2012

FESTIVE FRIDAY #19 CHALLENGE: STAMPIN' UP!'S SIMPLY SENT EVERYDAY ELEGANCE

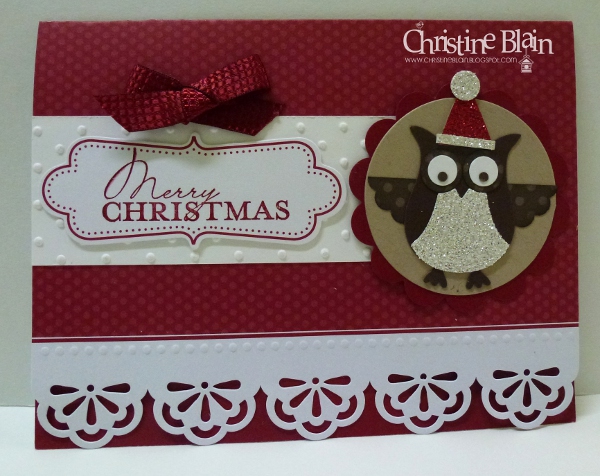
I was so energised by my discovery of my Simply Sent kit from Stampin' Up!  (see this post), that I just had to make another card.  Inspiration came from the DT samples for this week's Festive Friday Challenge, hosted by Nicole Derendorf.  This week Nicole has set a product challenge, to use glitter or glimmer on a Christmas card. I especially liked Sarah's use of the Owl Builder punch, and silver glimmer paper to "festive him up".  I've also embossed white card with polka dots, as Sarah did.

Here's my version, using one of the gorgeous Cherry Cobbler cards from Stampin' Up!'s Everyday Elegance Simply Sent kit:


Stamps: Contempo Christmas
Card: Everyday Elegance Simply Sent card base, Cherry Cobbler, Crumb Cake, Early Espresso and Whisper White cardstock
DSP: Early Espresso Patterns Designer Series Paper, Silver and Red Glimmer papers
Ink: Early Espresso and Cherry Cobbler stampin' pads
Other: Perfect Polka Dots embossing folder, 1 3/4" circle punch, Owl Builder punch, Scallop Oval punch. 2 3/8" Scallop Circle punch, sponge dauber, Tombow liquid glue, Cherry Cobbler quilted satin ribbon (not available here)


Monday, November 28, 2011

STAMPIN' UP! SPICED PAISLEY CHRISTMAS - JAI #95 & INKSPIRATIONS #97

I couldn't sleep last night - every time I closed my eyes, I had dozens of ideas swimming around in my head, just crying out to be made into cards!   So, after tossing and turning for about an hour, I got up and retreated to my craft room to try to settle my brain.

I made a card for this week's Just Add Ink challenge, to come up with a Christmas project using no Christmas stamps or Christmas papers.  Thankfully, a Christmas greeting is allowed!  The layout of my card was inspired by the sketch at Inkspirations:


Using my new Spiced Paisley stamp set (being released 1st December), and watercolour crayons, I create the stamped oval panel (I was going for a rustic look, and was pleased with the outcome).  Another stamp from this set provides the subtle background on the Crumb Cake panel, and the sentiment flag:


Stamps: Spiced Paisley (*new* - 1st December), Contempo Christmas
Card: Naturals Ivory, Riding Hood Red textured, Crumb Cake, Not Quite Navy
DSP: Not Quite Navy Patterns Designer Series Paper
Ink: Crumb Cake, Riding Hood Red and Not Quite Navy stampin' pads
Other: Regals and Neutrals Watercolour crayons, Cherry Cobbler seam binding, Very Vanilla Velvet ribbon (*new* - 1st December), Brights button, Linen Thread, sponge daubers, Vintage Wallpaper embossing folder, Eyelet border punch, Paper Piercing tool and Mat Pack, mini glue dots, Sticky Strip, Nestabilities, stampin' dimensionals

Saturday, November 26, 2011

STAMPIN' UP! CHRISTMAS-THEMED BLOG HOP

Today I'm taking part, with 8 friends who are also Stampin' Up! demonstrators in Australia, in a blog hop.  We have lots of ideas to share with you, for using Stampin' Up! products to make your Christmas projects.

You may have come from the very talented Alisha Watson's blog.  If not, you can start here, and follow the link at the end of my blog post, to go on to the next 'stop'.  Please visit all 9 of us if you can, and leave us some comment love, so we know you've stopped by!

I have two cards to share with you.  The first card evolved from a flower that my friend Nikki kindly showed me how to make.  I didn't attend Stampin' Up! Regionals training this month, but by all accounts it was a "wow" event, not least of all because of Miriam Spiess's flowers!  My first attempt is not all that great, but you get the idea!


...... and a close-up of the crimped, die cut and punched panels on the spine of the card:


Stamps: Merry & Type
Card: Cherry Cobbler, Basic Black
DSP: First Edition Specialty Designer Series Paper
Ink: Versamark inkpad, Cherry Cobbler and Basic Black stampin' pads
Other: Tasteful Trim XL Bigz die, Decorative Label punch, Scallop Trim border punch, Crimper,          2 3/8" Scallop Circle punch, 1 3/4" Scallop Circle punch, Antique Brad, sponge daubers, paper snips


My second card uses a sheet of Designer Series Paper, from the "Letters to Santa" pack, that I hadn't yet cut into.  I really like the colours on this card.  I used the rock 'n' roll technique with the ornament stamp, with varying 'intensity' of rolling, to achieve two different looks.  The ornaments were inked up first in Marina Mist ink, then rolled on my Early Espresso stampin' pad.  Hubby thinks this card is too "blingy", whereas I think one rhinestone brad and four self-adhesive rhinestones is quite understated! LOL.


.... and a close-up of the ornaments and 'bling'.  (I was more concerned about two bows being "over the top"!)


Stamps: Delightful Decorations, Contempo Christmas
Card: Crumb Cake, Early Espresso, Whisper White, Riding Hood Red and Marina Mist
DSP: Letters to Santa Designer Series Paper
Ink: Marina Mist and Early Espresso stampin' pads
Other: Ornament punch, Cherry Cobbler seam binding, Basic Rhinestones, Ice Circle Rhinestone brad, Scallop Edge border punch, stampin' dimensionals, White baker's twine (*new - out 1st December), mini glue dots


I really enjoyed making these cards, and hope I've inspired you to try something new.

Now it's time to visit Ros Davidson's blog. 


Here's a list of all the participants in today's hop. 

Tina Gillespie
http://scissorspapercard.blogspot.com/

Nikki Sadler
http://www.inkyart.com.au

Sue Madex
http://www.madexcreations.com

Di Dunk
http://www.stampartbydi.typepad.com

Judy May
http://www/judymay.typepad.com

Kathryn Mangelsdorf
http://klm55.blogspot.com

Alisha Watson
http://www.ratherbstampin.typepad.com

Christine Blain
www.christineblain.blogspot.com


Ros Davidson
www.rosdavidson.typepad.com
Thanks for stopping by, and have a great weekend!

Saturday, November 27, 2010

CHRISTMAS BLOG HOP

Today I am taking part in a blog hop, with 10 friends, to show you some projects with a CHRISTMAS theme.  You may have come here from Ros Davidson's blog, but if not, don't worry - you can continue in a loop and visit all 11 blogs by clicking on the link at the end of each blog post.  I'm sure you'll get some great ideas, visiting everyone's blogs.

I'd like to share with you a few Christmas cards I've chosen to make in non-traditional colours.

This first card is my favourite, but I would love to hear which one appeals most to you; they're all quite different.  Please leave a comment, and let me know you've been to visit!


Stamps: Friends 24-7, Contempo Christmas, Delightful Decorations
Card: Poppy Parade, Whisper White, Tempting Turquoise (textured)
Ink: Poppy Parade and Tempting Turquoise stampin' pads, Jet Black Staz-on inkpad
Other: Poppy Parade poly-stitched ribbon, Ornament Punch, Basic Rhinestones, stampin' dimensionals, Vintage Wallpaper embossing folder, Scallop Edge border punch, Stamp-a-ma-jig, mini glue dots


Next up is a less bright card; for this one, I've used another of Stampin' Up!'s "in colours", Peach Parfait, teamed with Basic Gray and Very Vanilla.


Stamps: Dasher, Snow Swirled
Card: Very Vanilla, Basic Gray
DSP: Peach Parfait Patterns Designer Series Paper (hostess pack)
Ink: Basic Gray and Peach Parfait stampin' pads
Other: Perfect Polka Dots embossing folder, Wide Oval Punch, Peach Parfait poly-stitched ribbon, sponge dauber, Eyelet Trim border punch, Basic Pearls


My last card uses green and purple, with cream, and I love it!  (Since I became a Stampin' Up! demonstrator, I don't think I've referred to colours as "green and purple, with cream"!!  That was a BIG step for me, to not use their SU! names, ha ha). 

Stamps: Tree Trimmings, Snow Swirled, En Francais
Card: Wild Wasabi (textured), Perfect Plum, Naturals Ivory
DSP: Wild Wasabi and Perfect Plum Patterns Designer Series Paper
Ink: Wild Wasabi, Perfect Plum and River Rock stampin' pads, Jet Black Staz-on inkpad
Other: Very Vanilla satin ribbon, Wide Oval Punch, sponge dauber, Eyelet Border punch, paper snips, mini glue dots


Next stop on today's blog hop is the blog of my friend Nikki Sadler.  We hope you'll visit all 11 blogs, and check out everyone's creations.  Here is a list of everyone participating in the blog hop; if you lose your way, just check back in here!


Ros Davidson
http://www.rosdavidson.typepad.com/


Christine Blain (that's me!)
http://christineblain.blogspot.com/


Nikki Sadler
http://www.inkyart.com.au/


Kristine Thompson
http://www.inkspotcreations.com/


Tina Gillespie
http://scissorspapercard.blogspot.com/


Di Dunk
http://www.stampartbydi.typepad.com/


Judy May
http://www.judymay.typepad.com/


Sue Madex
http://www.madexcreations.com/


Amy Buchanan
http://fashioninggreatimpressions.com/


Gardenia Pepworth
http://alittlelessuseless.wordpress.com/


Alisha Watson
http://ratherbstampin.typepad.com/


I hope you have a great day; I will - we're off to a wedding, and my boys will both be in suits!  What fun.  Will share photos later!

Saturday, November 20, 2010

JUST ADD INK #44

Second only to red, my favourite colours are earthy tones, so this week's colour challenge at Just Add Ink really tickled my fancy.


Last night I was a bit foggy-headed, in the aftermath of a migraine, but felt well enough to make a simple card.  I mention this because when I put my card scraps away, I was horrified to discover (and even more horrified that I hadn't noticed earlier) that I had used Early Espresso, instead of Chocolate Chip, cardstock on my card!!!  I am going to be unusually forgiving of myself, though, and have decided not to re-make the card; just pretend that the strip of card is a lighter brown than it really is, okay?!

It is a bit hard to tell in the photo I've taken, but the Christmas ornaments look a light gold colour.  I inked the stamp up first in River Rock ink, then used a sponge dauber to apply Frost White shimmer paint, before stamping the image onto white card.  I've taken a close-up shot so you can see some of the shimmer.


Here is the card in its entirety:


Stamps: Contempo Christmas, Delightful Decorations
Card: Whisper White, River Rock (textured), Early Espresso (let's just call it Chocolate Chip!), Wild Wasabi (textured)
Ink: River Rock and Wild Wasabi stampin' pads
Other: Ornament Punch, Wide Oval Punch, Vintage Wallpaper embossing folder, Chocolate Chip 1/4" grosgrain ribbon (retired), mini glue dots


Saturday, October 23, 2010

"TECHNIQUE" BLOG HOP

Today I am taking part, with 4 fellow Stampin' Up! demonstrators, in a "Technique" blog hop (just a "mini blog hop this time!).  Each of us is showcasing a different technique to use in your stamping and/or scrapbooking, so hopefully you'll get some new ideas!

You may have come from the gorgeous Nikki Sadler's blog, but if not, don't worry!  You can start here, and do a 'loop' by clicking on the link at the end of each participant's post, until you've covered all 5 stops.

The technique I have chosen to focus on today is PAPER PIECING.  This technique is ideal for using with line image (rather than solid) stamps.  It's an alternative to colouring in an image, and is a cute way to highlight a portion of a stamped image, to co-ordinate with patterned papers used on your project.

It's very easy to do.  Simply stamp your desired image onto cardstock, and stamp it again on patterned paper.  (Alternatively, you could stamp it onto other coloured card - either plain, or that you've stamped with a design.)  Cut the paper image out, and stick it over the top of the base image; voila - instant colouring!


For my first card, I have stamped several of one of the "Fifth Avenue Floral" flowers on a Whisper White panel.  I've chosen to highlight just one of the flowers in red (I do love red, and polka dots - did you know?!), using "Play Date" Designer Series Paper.  This is a very simple design, but the paper piecing makes the flower really "pop", don't you agree?


Stamps: Fifth Avenue Floral, Bella Toile, Upsy Daisy
Card: Whisper White, Real Red, Crumb Cake, Basic Black
DSP: Play Date Designer Series Paper
Ink: Crumb Cake stampin' pad, Jet Black Staz-On inkpad, Real Red and Basic Black markers
Other: Sponge dauber, Basic Black brads (from Neutrals assortment), Stamp-a-ma-jig, Mat Pack & paper-piercing tool (for placement of brads)


Next up is a Christmas card, using Jolly Holiday Designer Series Paper.  I stamped the Christmas tree (from the ever-versatile "Fun & Fast Notes" set) on Very Vanilla card.  I stamped it again on the Old Olive spotty paper, and cut around just the foliage before adhering it to my card.  I coloured the trunk, pot and star with markers.

Stamps: Fun & Fast Notes, Contempo Christmas, En Francais
Card: Very Vanilla, Old Olive, Cherry Cobbler
DSP: Jolly Holiday Designer Series Paper
Ink: Cherry Cobbler stampin' pad and marker, Jet Black Staz-On inkpad, Chocolate Chip marker, Daffodil Delight marker
Other: Wide Oval punch, Old Olive 5/8" grosgrain ribbon, Scallop Edge punch, mini glue dot


Lastly, I'd like to share with you a birthday card I made with a young boy in mind.  Again I've used "Play Date" Designer Series Paper - this time, the striped "boyish" paper.  I love that each pack of Stampin' Up!'s Designer Series Paper contains such a variety of designs, that complement one another so well.  The nose of the rocket is paper-pieced with Real Red cardstock on which I had stamped a star.  Pretty cute little rocket, don't you think?

Stamps: Seeing Stars, Pun Fun, Party Hearty
Card: Chocolate Chip, Tempting Turquoise (textured), Real Red, Crumb Cake
DSP: Play Date Designer Series Paper
Ink: Versamark inkpad, Tempting Turquoise, Crumb Cake, Chocolate Chip, So Saffron and Real Red stampin' pads
Other: Top Note die, sponge daubers, Buttons #5 Sizzlits die, Scallop Circle punch, 3/4" circle punch, 5/16" silver brad, Crystal Effects


Next stop on today's blog hop is the blog of the super-creative Amy Buchanan.  This girl blows me away with her ideas!


Here's a list of all of us taking part today:


Judy May
http://www.judymay.typepad.com/

Nikki Sadler
http://www.inkyart.com.au/

Christine Blain
http://www.christineblain.blogspot.com/

Amy Buchanan
http://www.fashioninggreatimpressions.com/

Tina Gillespie
http://scissorspapercard.blogspot.com/


Have fun checking out everyone's creations, and please leave us comments so we know you've been to 'visit'!