Wednesday, March 27, 2024

STAMPIN' UP! TRUSTY TOOLS BIRTHDAY CARD IN SMOKY SLATE


This week's Colour Creations blog hop is all about Smoky Slate, my favourite grey in Stampin' Up!'s Neutrals range.


This is the colour combination I have used:


... and here is my card, featuring the awesome Trusty Tools bundle:


I started by stamping a Smoky Slate card panel with images (the adjustable wrench and nut, screw and bolt stamps) from Trusty Tools, using Smoky Slate ink.  I stamped them randomly to create a background that would work in with the theme of my card.  I then used both the Light and Dark Smoky Slate Stampin' Blends markers, to splatter ink all over the design.  I did this by flicking the brush end of each marker against the lid, that I held in my other hand.  After sponging the edges of this piece with Smoky Slate ink, I adhered it to a Basic Gray card mat.  The Basic Gray layer is raised up on Black Stampin' Dimensionals, on the Thick Basic White card base.

On another piece of Smoky Slate card, I repeatedly stamped the same images, and added splatters.  I used this piece to die-cut the "Celebrate" (before mounting it on a Basic Gray die-cut piece) and some of the nuts and screws added to the background.

The second part of the sentiment is from the Notes of Nature stamp set.  It is stamped in Real Red ink on Basic white card, and tucked slightly underneath the Smoky Slate DSP strip laid across the card front.


Here's a closer look at the stamped background, and the little die-cut additions in Smoky Slate and Basic Gray:


On Basic White card, I stamped two adjustable wrenches in Basic Gray ink, then coloured them using the Light Smoky Slate Stampin' Blends marker.  After die-cutting them, I attached them to my Real Red peg board (cut using one of the dies in the Trusty Tools die set) with White Square Brads that I'd coloured with my Dark Smoky Slate Stampin' Blends marker.  Using the paper-piercing end of my Take Your Pick tool, I pierced a hole in each handle, and put the brads through to line up with holes in the peg board.  I left the wrenches "hanging" so that it's a little interactive element to the card - the handles are secured with the brads, but the tools can be moved around.


Inside my card I added a piece of Winter Meadow DSP, as I think the design looks a little "greasy", to tie in with the tool/workshop theme.  I stamped some screws, nuts and bolts along the bottom edge, and sponged the edges of the paper, using Smoky Slate ink.


Next up on tonight's blog hop is Rachel Woollard:


If you come across any broken links on the blog hop, or would like to see a full list of participants, head over to Catherine Proctor's blog.  Cathy does a fantastic job of co-ordinating our Colour Creations blog hops every week.

Listed below are all the products I used to make my card.  If you live in Australia, and would like to shop with me for your Stampin' Up! supplies, you can get to my online store by clicking on any of the thumbnail images below.


Product List

Wednesday, March 20, 2024

STAMPIN' UP! FLOWER CART BIRTHDAY CARD FEATURING SHADED SPRUCE


This week's blog hop, involving a group of Stampin' Up! demonstrators from around Australia, is all about Shaded Spruce.  I'm a lover of greens, but struggle a bit to use this bright, bold, emerald green - so this was a good challenge for me!

I started the design of my card by cutting a piece of Shaded Spruce Textured Shimmer Paper, using a Delicate Forest Die.  The card morphed into something quite different to my original vision, but I enjoyed the creative process, and I'm happy with how it turned out!


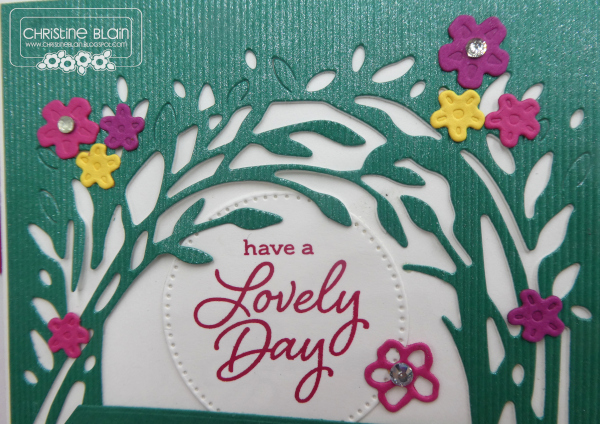
In this photo, you can (sort of!) see the lovely shimmer of the die-cut Shaded Spruce paper.  It's fairly thin, so I also die-cut a panel of Basic White card, and adhered the Shaded Spruce layer to it, to give it a bit more stability before gluing it to the Thick Basic White card base.

The round sentiment (stamped in Melon Mambo ink) was die-cut using a Stylish Shapes Die, and tucked under the leafy arch.

From Melon Mambo, Berry Burst and Daffodil Delight card, I die-cut some little flowers, using Sentimental Park Dies.  A few flower centres are adorned with Basic Rhinestones.


I stamped the second part of the sentiment in Versamark ink on Shaded Spruce card.  After sprinkling white embossing powder over it, I used my Heat Tool to create the raised embossed finish.  A Delicate Forest Die was used to crop this part of the sentiment.

On a piece of Basic White card, I stamped in Shaded Spruce ink the leaves from the Flower Cart stamp set.  I then stamped the flowers in Melon Mambo ink, and overstamped some of them using Berry Burst ink.  The lovely stamped florals were cut out with a co-ordinating die, and placed atop a cart die-cut from Crumb Cake card.

All of the elements on the bottom half of my card front were adhered to a Scalloped Contours die-cut rectangle in Basic White.


Next up on tonight's blog hop is Tina Gillespie:


If you come across any broken links, or would like to see a full list of participants in this week's blog hop, head over to Catherine Proctor's blog.  Cathy does a fantastic job of co-ordinating our Colour Creations showcases, every week.

Listed below are all the products I used to make my card.  If you live in Australia, and would like to shop with me for your Stampin' Up! supplies, you can get to my online store by clicking on any of the thumbnail images below.


Product List