Friday, April 25, 2014

JAI #212: STAMPIN' UP! EVERYTHING ELEANOR

Our challenge at Just Add Ink this week is my favourite kind - a colour challenge.  Delys chose this awesome colour combination for us to use on a card or other papercraft project:


I decided that I wanted my card to be mainly about the neutrals, with pops of gorgeous, vibrant,  Bermuda Bay.

On my Very Vanilla panel, I used Crumb Cake ink to stamp (second-generation, or "stamped off") Dictionary, and the flourish from Everything Eleanor.  I then used a die-cut Hexagon Hive piece of card as a stencil, and lightly sponged hexagons over the top of my stamped images.


Stamps: Dictionary, Everything Eleanor, Petite Pairs
Card: Crumb Cake, Baked Brown Sugar, Very Vanilla, Bermuda Bay
Ink: Crumb Cake, Baked Brown Sugar and Bermuda Bay stampin' pads
Other: Large Oval punch, paper snips, Blender Pen. Baked Brown Sugar stretch ruffle trim, Bermuda Bay 1/8" taffeta ribbon, Large Scallop thinlits die, Delicate Designs embossing folder, sponge dauber, Basic Pearls, Itty Bitty Shapes punch, sticky strip
 
 
The rest of the Design Team have come up with some gorgeous creations using this colour scheme - you can check them out here.  Won't you play along with us, too?  We'd love to see what you make.


Wednesday, April 23, 2014

DD #99 : STAMPIN' UP!'S ANOTHER GREAT YEAR

The current challenge at Dynamic Duos really called out to me, because it includes a colour I've been neglecting for a long time - Rich Razzleberry.

Here's the challenge:


I've let the large sentiment from Another Great Year take centre stage on my card.  It's gold-embossed, and the banners are coloured with a Rich Razzleberry marker.  I wanted to add some teensy flowers, but wanted them to be subtle, so used Creped Filter paper, and inserted a brad into each flower centre.
 
The light was not great for taking this photo - I got home from work when the natural light was fading, and, joy of joys, one of the fluorescent overhead lights in my craft room had decided to stop working!


Here's a better shot that shows the lovely sheen of the gold embossing:


Stamps: Another Great Year, Banner Blast
Card: Rich Razzleberry, Basic Black, Whisper White
DSP: Polka Dot Parade Designer Series Paper
Ink: Versamark inkpad, Basic Black craft stampin' pad, Whisper White craft stampin pad, Rich Razzleberry marker
Other: Gold stampin' emboss powder, Clear stampin' emboss powder, Essentials Paper-piercing pack, Paper-Piercing tool, Banner punch, Owl Builder punch (tiny heart on banner), Itty Bitty shapes punch, Neutrals and Brights brads, Tasteful Trim Bigz die, Creped Filter Paper, Sticky strip, sponge dauber


Tuesday, April 22, 2014

STAMPIN' UP! SECRET GARDEN FOR SUO #95

There's a new challenge up at SUO Challenges, and it's "featuring flowers".  It is a bit hard to narrow down the choices, when it comes to floral offerings from Stampin' Up!  I do, however, love flower stamps that have matching framelits, so I have used the Secret Garden bundle for this challenge.

 When making this card for my dear friend, I drew inspiration from a card (I'd seen a while ago) made by Jodi Collins.  Now that I've gone back to Jodi's blog, I can't for the life of me find the card that sparked this idea, but I feel I need to give her some credit!


Stamps: Secret Garden, Petite Pairs
Card: Wisteria Wonder, Whisper White
DSP: Naturals Composition Specialty Designer Series Paper
Ink: Wisteria Wonder and Pear Pizzazz stampin' pads, Jet Black Staz-On inkpad
Other: Secret Garden framelits, Neutrals and Subtles Candy Dots, Blender pen, Wisteria Wonder chevron ribbon, Tea Lace paper doilies, glue dots


Friday, April 18, 2014

JAI #211: STAMPIN' UP! PERFECT PENNANTS KALEIDOSCOPE BIRTHDAY CARD!

This week at Just Add Ink, Paula has come up with a fabulous sketch for us to use on our cards or scrapbook pages.  It's a fabulous, versatile, sketch that I can see myself using over and over again.  (In fact, I think I already make a lot of cards with a similar layout!  Love it.)


 I am a compulsive purchaser of Stampin' Up! products, and had an unopened packet of Kaleidoscope Designer Series Paper crying out to be used.  I decided to make a bright, cheery card that I think would really suit a teenage girl.  As it turned out, it did get the tick of approval from my 18-yr-old son and his sweet girlfriend who will be 18 in a few months.
 
One of my favourite features of this card is the heart I stamped, in Strawberry Slush ink, behind the sentiment.  Simple, but it makes me happy!  There's a good demonstration, on my card, of how well SU! co-ordinates its products.  I stamped the heart  (from Perfect Pennants) two more times in Strawberry Slush ink, on Whisper White card.  I used the little heart die from the Circles Card thinlits set to cut out the hearts.  They were then layered onto Silver Glimmer hearts cut using one of the heart shaped dies from the Hearts A Flutter framelits collection.  Great match, don't you think?
 
The three black embellishments in the top left of the card are Basic Large Rhinestones, coloured with a black Sharpie pen.


Stamps: Perfect Pennants
Card: Strawberry Slush, Whisper White, Bermuda Bay, Silver Glimmer Paper
DSP: Kaleidoscope Designer Series Paper
Ink: Strawberry Slush stampin' pad, Jet Black Staz-on inkpad, Black Sharpie pen
Other: Circles framelits, Starburst framelits, Circles Card Thinlits, Hearts A Flutter framelits, Adorning Accents edgelits, Strawberry Slush stretch ruffle trim, Basic Large Rhinestones, stampin' dimensionals, sticky strip


It took almost all my strength to refrain from sponging the edges of my paper and cardstock on this card!  Right outside my comfort zone, but I wanted a clean, crisp look.  I love how it turned out.

Make sure you check out the rest of the Just Add Ink Design Team's samples.  We'd love to see your papercraft creation using this sketch, too.


Friday, April 11, 2014

JAI #210 : MASCULINE EASTER BASKET

This week at Just Add Ink, Kim has challenged us to make an Easter bag, box or basket.

Easter really hasn't been "on my radar" this year, as hubby and youngest son are following the Paleo eating plan.  Refined sugars, and chocolate, are off the list altogether.  My eldest son is way past the age of appreciating cutesy Easter packaging, so this challenge spurred me on to make a somewhat unconventional Easter basket - one with a masculine twist.

I created a basket, using Early Espresso Core'dinations cardstock, following this fabulous tutorial from Deb Valder.  Stampin' Up!'s Envelope Punch Board is FANTASTIC for those of us who are 3-D challenged!  I decorated parts of the basket with Soho Subway Designer Series Paper, and added ribbon and brads in co-ordinating colours.  The basket handle is embossed with the Square Lattice embossing folder - a favourite of mine, for masculine projects.

Here's the basket, filled (for display purposes only!) with chocolate bunnies that will be eaten by me at Easter:


The sentiment is stamped on an Easter Egg-shaped (ie, oval, LOL) label:


The back of the basket is simply decorated, with DSP and a (retired) brad:


.....  and my final photo is of the handle, created using the Small Scallop Rotary Cutting Blade (on my Stampin' Trimmer), and Square Lattice embossing folder.  A couple of ribbons tied together add a bit more detail, without too much 'fuss':


Stamps: Delightful Dozen, Polka Builder Wheel
Card: Early Espresso Core'dinations cardstock, Naturals Ivory
DSP: Soho Subway Designer Series Paper
Ink: Early Espresso, Island Indigo and Summer Starfruit stampin' pads
Other: Envelope Punch Board, Small Scallop Rotary Cutting Blade (in Stampin' Trimmer), Square Lattice embossing folder, XL Oval punch, sponge dauber, In Color brads (retired), Summer Starfruit stitched satin ribbon, Early Espresso 1/4" stitched grosgrain ribbon, glue dots, Multipurpose Liquid Glue


The rest of the Just Add Ink Design Team have come up with some adorable Easter projects, so make sure you take a look here.  We hope you'll play along with us!


Thursday, April 10, 2014

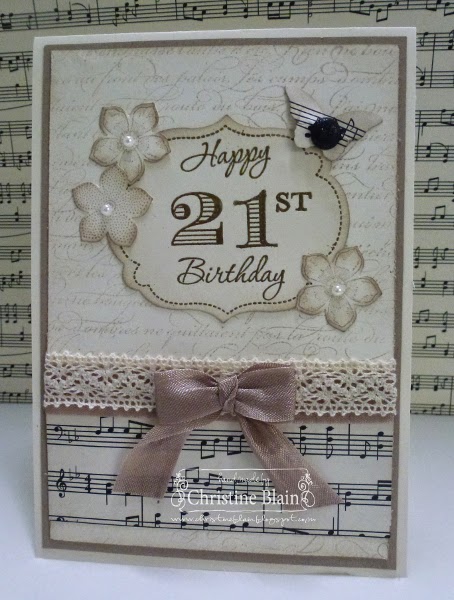
SC #77 : A 21st BIRTHDAY CARD

I've discovered a new (well, new to me) papercraft challenge blog!!  It would appear, as this is the 77th challenge, that it's been around for a while - but I just don't know how I have never stumbled across it before.  Here's the gorgeous inspiration pic for this month's challenge at Stampin' Celebration:


I was particularly inspired by the creamy neutrals, the script, flowers, butterfly, lace, and music notes ... they all came together on a card I made for a special young woman, who is a talented singer and song-writer (and who I will be enjoying lunch with tomorrow).

Here's what I made:


Stamps: En Francais, Petite Petals, Memorable Moments
Card: Very Vanilla, Crumb Cake
DSP: Modern Medley Designer Series Paper
Ink: Crumb Cake stampin' pad, Versamark inkpad
Other: Gold stampin' emboss powder, Labels Collection framelits, Bitty Butterfly punch, Petite Petals punch, Victoria Crochet lace trim, Crumb Cake seam binding, Basics Glimmer Brad, Basic Pearls, sponge dauber, Stamp-a-ma-jig, glue dots


Monday, April 7, 2014

MM #103 : SNOWMAN CHRISTMAS

I am thrilled this week to be a Guest Designer at Merry Monday, my favourite Christmas Card Challenge site. 

Here's the brief for this week's challenge:


As a Stampin' Up! demonstrator, I like to use Stampin' Up! products almost exclusively on my cards.  However, I went into a mild panic with this challenge, because I don't own a snowman stamp from SU!  I realised I have a cute, uninked, snowman stamp in a Papertrey Ink stamp set, so all was not lost!


Stamps: Holiday Button Bits (PTI), Sassy Salutations
Card: Cherry Cobbler, Whisper White, Crumb Cake
DSP: Season of Style Designer Series Paper
Ink: Jet Black Staz-On inkpad, Crumb Cake stampin' pad and marker, Whisper White craft stampin' pad, Pumpkin Pie marker
Other: Neutrals button, Paper-piercing tool and Stampin' Pierce Mat, Natural Chevron ribbon (reverse), Baked Brown Sugar stretch ruffle trim, Cherry Cobbler baker's twine, White baker's twine, Deco Labels framelits, stampin' sponge, glue dots, Multipurpose liquid glue, Stampin' Dimensionals
 
 
Many thanks to the Merry Monday DT for picking my card as a winner, and therefore giving me the opportunity to be a Guest Designer for this week's challenge - it has been great fun!


Friday, April 4, 2014

JAI #209: JUST ADD LAYERS

This week at Just Add Ink, Delys has laid down the challenge to "just add layers" to your card or other papercraft project.

I love to add layers to my cards ("one layer", and "clean and simple", are terms that terrify me!).  I stayed fairly conservative with my sample for this week's challenge, though, as it had to be posted - and I wanted it to reach the recipient in reasonable condition!

Using the beautiful Afternoon Picnic Designer Series Paper, I was able to add extra dimension to the pattern already printed in the paper, by cutting out and adhering extra roses.  Dazzling Details adds a bit more 'pretty' to the flowers.


The sentiment has been layered up on stampin' dimensionals.


Stamps: Label Love
Card: Wisteria Wonder, Very Vanilla
DSP: Afternoon Picnic and Pear Pizzazz Patterns Designer Series Papers
Ink: Wisteria Wonder and Pear Pizzazz stampin' pads
Other: Artisan Label punch, 1 3/8" Circle punch, 1 3/4" Scallop Circle punch, Beautiful Wings embosslits, Basic Pearls, sponge daubers, Very Vanilla seam binding, Pear Pizzazz taffeta ribbon, glue dots, Dazzling Details
 
 
We'd love to have you join in the fun at Just Add Ink this week.  Check out the rest of the Design Team's samples, for some inspiration!