
Today's card is my first creation with the Woven Textures Designer Series Paper. The natural, earthy, tones lend themselves well to a masculine card. This card also features a new favourite sentiment stamp set - Layered Thoughts - that is coming out in the new Annual Catalogue on 6th May.
To create the patterned background, I first cut a number of 1.5cm wide strips of Woven Textures DSP. I covered a Basic White piece of card with Multipurpose Liquid Glue, then adhered the strips. Lastly, I cut out the decorated piece of card using a Textured Notes Die.
This panel is mounted on a slightly larger piece of Gray Granite card, and an Early Espresso card base. I did cut down the size of the card base a little, to better fit the largest Textured Notes Die.
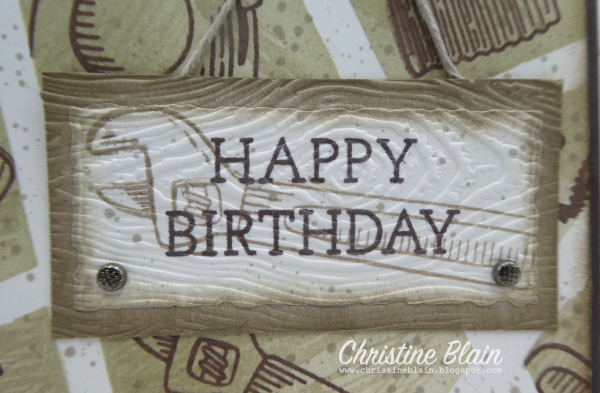
The sentiment was stamped in Early Espresso ink, on a piece of the Woven Textures DSP. After cutting it out using another of the Textured Notes Dies, I stamped the nuts, bolts and screws in Crumb Cake ink. I used Crumb Cake ink to sponge around the edges of this die-cut piece.

Using Gray Granite ink, I stamped the paintbrush onto Gray Granite card, then cut it out using the co-ordinating die. A separate die, for the bristles, was used to cut a piece of Early Espresso card. I added an Adhesive-Backed Textured Dot to the brush handle.


Listed below are the current products I used to make this card. The Layered Thoughts stamp set is not available until 6th May, unless you'd like to join my Stampin' Up! team, to be able to pre-order products before they're officially available. If this is something that appeals to you, you might like to click on the "Join My Stampin' Up! Team" tab up the top of this page.
If you live in Australia, and would like to shop with me for your Stampin' Up! supplies, you can get to my online store by clicking on any of the thumbnail images below.
Tomorrow I will share another Woven Textures card, before I take a week's break; I'm off on a little holiday.

![Early Espresso A4 Card Stock [ 121686 ]](https://assets1.tamsnetwork.com/images/EC042017NF/121686s.jpg "Early Espresso A4 Card Stock [ 121686 ]") | ![Gray Granite A4 Cardstock [ 147008 ]](https://assets1.tamsnetwork.com/images/EC042017NF/147008s.jpg "Gray Granite A4 Cardstock [ 147008 ]") | ![Crumb Cake A4 Card Stock [ 121685 ]](https://assets1.tamsnetwork.com/images/EC042017NF/121685s.jpg "Crumb Cake A4 Card Stock [ 121685 ]") | ![Basic White A4 Cardstock [ 166781 ]](https://assets1.tamsnetwork.com/images/EC042017NF/166781s.jpg "Basic White A4 Cardstock [ 166781 ]") | |
![Gray Granite Classic Stampin' Pad [ 147118 ]](https://assets1.tamsnetwork.com/images/EC042017NF/147118s.jpg "Gray Granite Classic Stampin' Pad [ 147118 ]") | ![Crumb Cake Classic Stampin' Pad [ 147116 ]](https://assets1.tamsnetwork.com/images/EC042017NF/147116s.jpg "Crumb Cake Classic Stampin' Pad [ 147116 ]") | ![Stampin' Cut & Emboss Machine [ 149653 ]](https://assets1.tamsnetwork.com/images/EC042017NF/149653s.jpg "Stampin' Cut & Emboss Machine [ 149653 ]") | ||
![Textured Notes Dies [ 165555 ]](https://assets1.tamsnetwork.com/images/EC042017NF/165555s.jpg "Textured Notes Dies [ 165555 ]") | ![Trusty Tools Dies [ 162722 ]](https://assets1.tamsnetwork.com/images/EC042017NF/162722s.jpg "Trusty Tools Dies [ 162722 ]") | ![Adhesive Backed Textured Dots [ 163338 ]](https://assets1.tamsnetwork.com/images/EC042017NF/163338s.jpg "Adhesive Backed Textured Dots [ 163338 ]") | ![Sponge Daubers [ 133773 ]](https://assets1.tamsnetwork.com/images/EC042017NF/133773s.jpg "Sponge Daubers [ 133773 ]") | ![Multipurpose Liquid Glue [ 110755 ]](https://assets1.tamsnetwork.com/images/EC042017NF/110755s.jpg "Multipurpose Liquid Glue [ 110755 ]") |
![Trusty Tools Photopolymer Stamp Set (English) [ 163274 ]](https://assets1.tamsnetwork.com/images/EC042017NF/163274s.jpg "Trusty Tools Photopolymer Stamp Set (English) [ 163274 ]")
![Woven Textures 12" X 12" (30.5 X 30.5 Cm) Designer Series Paper [ 165560 ]](https://assets1.tamsnetwork.com/images/EC042017NF/165560s.jpg "Woven Textures 12\" X 12\" (30.5 X 30.5 Cm) Designer Series Paper [ 165560 ]")
![Early Espresso Classic Stampin' Pad [ 147114 ]](https://assets1.tamsnetwork.com/images/EC042017NF/147114s.jpg "Early Espresso Classic Stampin' Pad [ 147114 ]")


")
")


 Designer Series Paper")


